Showing posts with label Surcharge. Show all posts

Monday, August 5, 2013

How is the St Venant Equation Solved for in the Dynamic Wave Solution of SWMM 5?

Subject:   How is the St Venant Equation Solved for in the Dynamic Wave Solution of SWMM 5?

An explanation of the four StVenant Terms in SWMM 5 and how they change for Gravity Mains and Force Mains. The HGL is the water surface elevation in the upstream and downstream nodes of the link. The HGL for a full link goes from the pipe crown elevation up to the rim elevation of the node + the surcharge depth of the node.  The four terms are:

dq2 = Time Step * Awtd * (Head Downstream – Head Upstream) / Link Length or
dq2 = Time Step * Awtd * (HGL) / Link Length
Qnew = (Qold – dq2 + dq3 + dq4) / ( 1 + dq1)
when the force main is full dq3 and dq4 are zero and
Qnew = (Qold – dq2) / ( 1 + dq1)
The dq4 term in dynamic.c uses the area upstream (a1) and area downstream (a2), the midpoint velocity, the sigma factor (a function of the link Froude number), the link length and the time step or
dq4 = Time Step * Velocity * Velocity * (a2 – a1) / Link Length * Sigma
the dq3 term in dynamic.c uses the current midpoint area (a function of the midpoint depth), the sigma factor and the midpoint velocity
dq3 = 2 * Velocity * ( Amid(current iteration) – Amid (last time step) * Sigma
dq1 = Time Step * RoughFactor / Rwtd^1.333 * |Velocity|
The weighted area (Awtd) is used in the dq2 term of the StVenant equation:
dq2 = Time Step * Awtd * (Head Downstream – Head Upstream) / Link Length

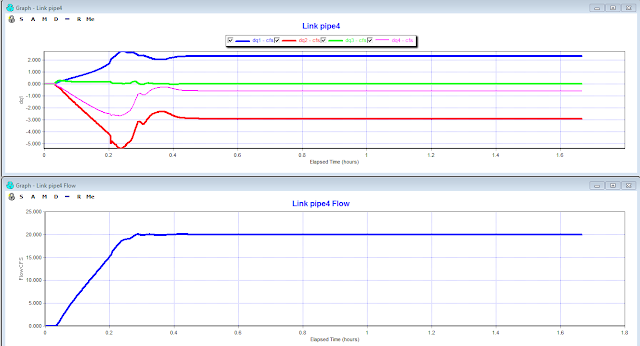
The four terms change at each iteration and time step to determine the new flow (Figure 1) based on the two equations:

Denom = 1 + dq1 + dq5
Q = [Qold – dq2 + dq3 + dq4] / Denom

If you look at a table of the values you will see that the terms add up to zero when the flow is constant and to delta Q or the change in Q when the flow is NOT constant (Figure 2).


Figure 1.  The four terms define the new flow at each iteration in the dynamic wave solution of SWMM5


Figure 2.   The magnitude of the four terms determine the flow at the new iteration and ultimately the new Time Step.  If the flow is constant then the value of the term is constant.

Sunday, August 4, 2013

Surcharged Node and the Link Connection in SWMM 5

Subject:   Surcharged Node and the Link Connection in SWMM 5

surcharged node in SWMM 5 uses this point iteration equation (Figure 1):

dY/dt = dQ / The sum of the Connecting Link values of  dQ/dH

where Y is the depth in the node, dt is the time step, H is the head across the link (downstream – upstream), dQ is the net inflow into the node and dQ/dHis the derivative with respect to H of the link  St Venant equation.  If you are trying to calibrate the surcharged node depth, the main calibration variables are the time step and the link  roughness:

1.   Mannings's N
2.   Hazen-Williams or
3.   Darcy-Weisbach 
The link roughness is part of the term dq1 in the St Venant solution and the other loss terms are included in the term dq5.  You can adjust the roughness of the surcharged link  to affect the node surcharge depth.

Figure 1.  The Node Surcharge Equation is a function of the net inflow and the sum of the term dQ/dH in all connecting links. Generally, as you increase the roughness the value of dQ/dH increases and the denominator of the term dY/dt = dQ/dQdH increases. 

Figure 2.  The value of dQ/dH in a link as the roughness of the link increases.

Saturday, August 3, 2013

InfoSWMM and Arc GIS for Surcharge and Flooded Time

Subject:  InfoSWMM and Arc GIS Layer Properties for Surcharge and Flooded Time

An important advantage of using InfoSWMM is the ability to use all of the Arc GIS layer and programming tools.  For example, you can graph the model results for the flooded and surcharged time in a node using a Bar/Column plot to show the surcharge time in the node and the flooded time in the node.  A flooded node is always considered to be surcharged but a surcharged node does not always flood.  The surcharge level is any water surface elevation above the highest connecting crown elevation but the flooded time is a water surface elevation at or exceeded the rim elevation of the node.
InfoSWMM and Arc GIS Layer Properties for Surcharge and Flooded Time


Monday, July 29, 2013

How is the St Venant Equation Solved for in the Dynamic Wave Solution of SWMM 5?
Subject:   How is the St Venant Equation Solved for in the Dynamic Wave Solution of SWMM 5?

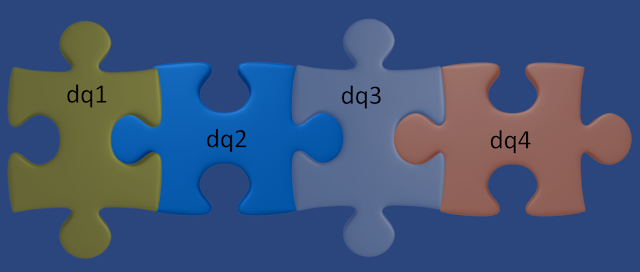
An explanation of the four St. Venant Terms in SWMM 5 and how they change for Gravity Mains and Force Mains. The HGL is the water surface elevation in the upstream and downstream nodes of the link. The HGL for a full link goes from the pipe crown elevation up to the rim elevation of the node + the surcharge depth of the node.  The four terms are:

dq2 = Time Step * Awtd * (Head Downstream – Head Upstream) / Link Length or
dq2 = Time Step * Awtd * (HGL) / Link Length
Qnew = (Qold – dq2 + dq3 + dq4) / ( 1 + dq1)
when the force main is full dq3 and dq4 are zero and
Qnew = (Qold – dq2) / ( 1 + dq1)
The dq4 term in dynamic.c uses the area upstream (a1) and area downstream (a2), the midpoint velocity, the sigma factor (a function of the link Froude number), the link length and the time step or
dq4 = Time Step * Velocity * Velocity * (a2 – a1) / Link Length * Sigma
the dq3 term in dynamic.c uses the current midpoint area (a function of the midpoint depth), the sigma factor and the midpoint velocity
dq3 = 2 * Velocity * ( Amid(current iteration) – Amid (last time step) * Sigma
dq1 = Time Step * RoughFactor / Rwtd^1.333 * |Velocity|
The weighted area (Awtd) is used in the dq2 term of the St. Venant equation:
dq2 = Time Step * Awtd * (Head Downstream – Head Upstream) / Link Length

The four terms change at each iteration and time step to determine the new flow (Figure 1) based on the two equations:

Denom = 1 + dq1 + dq5
Q = [Qold – dq2 + dq3 + dq4] / Denom

If you look at a table of the values you will see that the terms add up to zero when the flow is constant and to delta Q or the change in Q when the flow is NOT constant (Figure 2).


Figure 1.  The four terms define the new flow at each iteration in the dynamic wave solution of SWMM5
  
Figure 2.   The magnitude of the four terms determine the flow at the new iteration and ultimately the new Time Step.  If the flow is constant then the value of the term is constant.

Sunday, July 28, 2013

Pump / Force Main System in InfoSWMM and SWMM 5 - with Emojis

Subject: 🚀 Pump / Force Main System in InfoSWMM and SWMM 5

Introduction: 💡 The Pump/Force Main system in InfoSWMM and SWMM 5 is a critical component for effective wastewater management. It ensures that wastewater flows smoothly from its source to the desired destination. Let's explore its components and the steps to set it up!

📌 The Basic System:

  • Wet Well with its parameters 🕳️
  • Pump Type 🔄
  • Defined Pump Curve 📈
  • Downstream Pressure Node 📍
  • Downstream Force Main 🛤️
Figure 1:  The Basic System

Step 1: Wet Well Data 📋

  • Input the invert elevation and maximum depth of the Wet Well.
  • Define the shape, considering evaporation or infiltration factors.


Step 2: Define the Pump Type 🔄

  • The pump's operation is guided by its Pump Curve and the set On and Off elevations.
  • The four primary pump types include:
    • Volume - Flow 🌊
    • Depth – Flow 📏
    • Head – Flow 📌
    • Depth - Flow 📊

Step 3: Define the Pump Curve 📈

  • Under the Operation Tab, outline the desired pump curve to ensure efficient pump functioning.


Step 3:  Define the Pump Curve in the Operation Tab 


Step 4: Set a Surcharge or Pressure Depth 🌡️
  • By setting a positive Surcharge Depth at the Downstream node, you ensure that during the simulation, the node remains pressurized, driving the flow through the Force Main.
  • This plot offers a visual representation of the hydraulic gradient line (HGL) for the Force Main System, showcasing the pressure changes within the system.

  • Define the downstream conduits emerging from the pump as Force Mains.
  • Choose either the Hazen Williams or Darcy-Weisbach coefficient based on your requirements. (This is typically set in SWMM 5 options or InfoSWMM's Run Manager.)

Step 5: Force Main Data 🛤️


Step 6: HGL Plot of the Force Main System 📊


Step 7: Pump Summary 📑

  • Refer to the RPT File to get a comprehensive summary of the pump's performance and other related parameters.

Conclusion: 🌟 Setting up the Pump/Force Main system in InfoSWMM and SWMM 5 is a meticulous process but ensures efficient and effective wastewater management. Following these steps will ensure a robust system in place! 🚀🌊🛠️


Manhole Elevations in InfoSWMM and SWMM 5

Subject: Manhole Elevations in InfoSWMM and SWMM 5

Starting from the bottom of the manhole you have these regions of computational interest:

1.   Manhole Invert to the lowest link invert – the node continuity equation is used with the area of the manhole being the default surface area of a manhole,
2.   Lowest Link Invert to the Highest Link Crown Elevation – the node continuity equation is used with surface of the node being normally half of the surface area of the incoming and outgoing links,
3.   Highest Manhole Pipe Crown Elevation to Manhole Rim Elevation – the node surcharge algorithm in which the surface area of the manhole is not used and the surcharge depth is iterated until the inflow and the outflows of the node are in balance,
4.   The region above the Manhole Rim Elevation which can use one of four options to calculate the depth and/or flow out of or into the manhole:
1.   No Surcharge Depth is entered and No Ponding area is used – the excess water into the manhole is lost to the network and shows up as internal outflow in the continuity tables,
2.   A Ponding Area is used and the excess flow will  pond on the surface of the manhole and later go back down into the conveyance pipes.
3.   A Surcharge Depth is used and the depth will continue to be calculated using the node surcharge algorithm in which the surface area of the manhole is not used and the surcharge depth is iterated until the inflow and the outflows of the node are in balance,
4.   A Dual Drainage system is simulated and the excess flow of the manhole is simulated in the street gutters or the actual street,
5.   You use a 1D/2D linkage between the 1D manhole and 1D links to a 2D Mesh and simulate the flow out and the flow into the manhole using a bottom outlet orifice that switches automatically between weir and orifice flow based on the depth on top of the manhole. 


St. Venant Terms in SWMM 5 and how they change for Force Mains

Note:  An explanation of the four StVenant Terms in SWMM 5 and how they change for Force Mains.  The HGL is the water surface elevation in the upstream and downstream nodes of the link.  The HGL for a full link goes from the pipe crown elevation up to the rim elevation of the node + the surcharge depth of the node.  dq1 is calculated differently based on full or partially full force mains and gravity mains

            dq2 = Time Step * Awtd * (Head Downstream – Head Upstream) /  Link Length  or

            dq2 = Time Step * Awtd * (HGL) /  Link Length

            Qnew = (Qold – dq2 + dq3 + dq4) / (  1 + dq1)

when the force main is full dq3 and dq4 are zero and

Qnew = (Qold – dq2) / (  1 + dq1) 

The dq4 term in dynamic.c uses the area upstream (a1) and area downstream (a2), the midpoint velocity, the sigma factor (a function of the link Froude number), the link  length and the time step or

            dq4 = Time Step * Velocity * Velocity * (a2 – a1) / Link Length * Sigma

the dq3 term in dynamic.c uses the current midpoint area (a function of the midpoint depth), the sigma factor and the midpoint velocity

            dq3 = 2 * Velocity * ( Amid(current iteration) – Amid (last time step) * Sigma

dq1 = Time Step * RoughFactor / Rwtd^1.333 * |Velocity|

The weighted area (Awtd) is used in the dq2 term of the StVenant equation:

            dq2 = Time Step * Awtd * (Head Downstream – Head Upstream) /  Link Length


InfoSWMM and H2oMAP SWMM Map of the Maximum Surcharge Depth Over Highest Pipe Crown

Note:  You can copy and paste information from the Junction Output Summary to a newly created Junction Information DB Column so that you can use Map Display to visually see the newly saved output variable.

Step 1:  Run the model and then go to the Junction Summary in Report Manager and select all of the nodes in your model.


Step 2:  Copy the Maximum Surcharge Height over Highest Pipe Crown Column


Step 3:  Make and Insert a New Editable Field in the Junction Information Table by Pasting the information you just copied from the Junction Summary  Output Column.


Step 4:  Use the Map Display Command and use Existing DB as the Source and the newly created variable Junction_Surcharge_Depth


Step 5:  Use the Option Show Label Properties and adjust the Font to show the maximum surcharge depth.


AI Rivers of Wisdom about ICM SWMM

Here's the text "Rivers of Wisdom" formatted with one sentence per line: [Verse 1] 🌊 Beneath the ancient oak, where shadows p...